| |
|
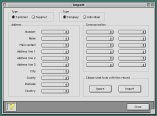
The
Import Customers & Suppliers window controls the import of
details from a tab-delimited text file. (Tab delimited files are a
common way of exchanging information between programs).
Starting
the Import
When
you open the import window, you will be presented with an open file
dialog. Choose the file that you wish to import, and you will be
brought to the window shown above. This window lets you set up the
details of each record you import - with records imported one at a
time.
Choosing
Fields
For
each record, you will need to choose the type and status of the
record - it will either be a Customer or Supplier, and
a Company or Individual. You then need to match up
what is in the import file, with what CashBook 200 is looking
for.
In the Address section, you will see the fields that CashBook
200 uses, and beside each field is a drop down box. This drop
down box contains the details in the current record of the import
file. For each address field, you may choose one of the fields in
its adjacent drop down box. It is not necessary to choose something
for each drop down box, and you may repeat a choice in separate
fields.
The communication fields work in a slightly different way. As you
can see from the screen below, you first need to choose to which
communication field you are matching the data
(1).

You
may then choose the import data you wish to be matched to the field (2).
Ignoring
and Importing
When
you have finished matching up fields, click the Import button
to import the data into the cashbook file. Click the Ignore
button to ignore the record and move on to the next record.
|
|
|
